As a hiker, you know that there’s nothing quite like the feeling of being in nature, surrounded by the beauty of the wilderness. Photography can add an extra level of excitement and enjoyment to your hiking experience. But taking great hiking photos isn’t always easy – especially when you’re dealing with difficult terrain and challenging lighting conditions. In this guide we’ll cover everything you need to know to get started with hiking photography, and a whole lot of tips you can use to continuously improve your skills.
UPDATED: September 2023
This post contains affiliate links. This means I may make a small commission if you make a purchase suing one of these links. I’ve linked to some of the gear I carry in my own photography bag, as well as gear I’ve used previously and recommend.
Table of Contents
What is Hiking Photography?
Simply put, hiking photography is taking photographs while hiking. This can mean taking photos of the landscapes or things you see on your hike or capturing images of yourself on your adventures. Hiking photography can be for yourself, to share with friends and family, or as content you create for businesses or brands.
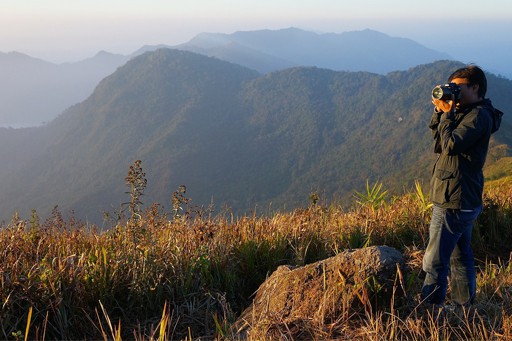
The best hiking photos are often the ones that capture the photographer’s sense of adventure.
What Kind of Camera is Best for a Hiking Trip?
Simple Answer: The best camera to use for a hiking trip depends on what you’ll be using the photos for. If they’re for personal use and sharing with family and friends, your phone or a point and shoot camera will be just fine. But if you’re wanting to use the photos for commercial use, like if you’re shooting for a client or your business Instagram page, a more professional camera might be a better fit. DSLR and mirrorless cameras are generally thought to be “professional” cameras. Though I have seen amazing content produced with phones or point and shoot cameras as well.
Let’s talk a bit about the different camera types
Phone
Gone are the days of grainy 2MP phone pictures on your Motorola Razr. Phone cameras are pretty amazing these days. Today’s phone boast high quality images with (as of posting) up to 108MP and even 4k and 8k video.
Phones that offer pro mode or similar let you choose aperture, iso, shutter speed and have a choice of focal points letting you take photos with effects that were once only available with DSLR or their mirrorless counterparts.
It’s safe to say that you can create amazing, beautiful images with just your phone.
Pros: Portable, you always have it with you anyway! Cost friendly if you already own one with a good camera. Still most likely cheaper than a DSLR or mirrorless if you don’t.
Cons: Limited settings and creative options, not as high quality a DSLR or mirrorless, easier video editing options
Point and Shoot
Point and shoot cameras have come a long way since I had my first in middle school. With some offering around 20MP, they offer higher photo quality than most phones allow for.
They’re also lighter, cheaper, and more compact than DSLR or mirrorless cameras.
Pros: Light, budget friendly, compact, easy to use.
Cons: Limited settings, lower MP/photo quality
DSLR
One of your options if you’re looking for interchangeable lenses. Some of the big names for DSLR cameras are Canon, Nikon, and Sony.
DSLRs can get expensive when figuring in cost of camera body, lenses, and lens accessories. Don’t let price deter you if you have your heart set on a DSLR. The kit lens that comes with the body is enough to get you started!
UPDATE: DSLR is being phased out in favor of mirrorless. This means that prices should continue dropping on DSLR cameras and related lenses and accessories!
Pros: Opportunity for creativity, choice of lenses,
Cons: Weight, cost
Mirrorless
Your second option for interchangeable lenses. Canon, Nikon, Sony are again, the big names for mirrorless.
Mirrorless cameras are lighter than DSLRs but have all the same capabilities. Like DSLRs, mirrorless cameras can get expensive after factoring in lenses and accessories.
Pros: Lighter than DSLR
Cons: Cost can get pretty high, similar to that of DSLR
Whichever type of camera you choose, it’s important to learn it inside and out. Knowing the settings and modes can only help you get better, faster, and more successful at capturing exactly what you envision.
What are the Best Lenses for Hiking Photography?
There are so many lens choices out there! But what are the best lenses for hikers and outdoor enthusiasts?
Wide Angle Lenses
Wide angle means wider than the human eye can see. A lens with a focal length of 35mm or less is considered wide angle. Capture more of the scene in front of you. You can use a wide angle lens to put emphasis on the subject.
Example of when to use a wide angle lens: You want to capture a picturesque landscape or you want to capture a client’s product with the surrounding in the image as well.
Telephoto Lenses
These are also called zoom lenses. Good for finding the perfect composure, bringing your subject closer to the camera, and capturing detail in subjects that are far away.
Example of when a telephoto lens is handy: You want to capture a wild animal you see on your hike, or you want to get ‘closer’ to the distant mountain peak.
Prime Lenses
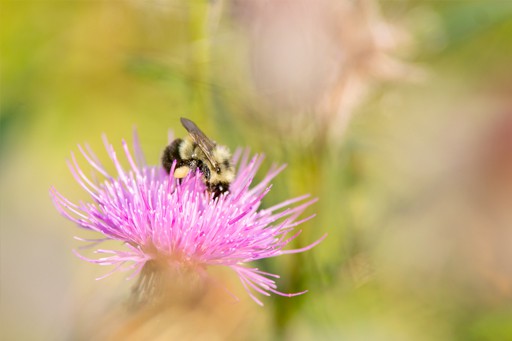
Prime lenses create super sharp images. I use mine for detail shots such as a close up of the inside of a flower or a group of mushrooms on the forest floor. They allow you to take photos in darker settings due to the amount they allow in. They’re also usually very small, often called pancake lenses.
Composing Your Hiking Photos
Composition is just the way everything in your photo works together. The National Gallery defines it as “the way in which all its elements work together to produce an overall effect.”
To start composing an image, think about what your photo is trying to say. What is the focus of the image? Once you know what you’re going for, it becomes much easier to compose an effective photo.
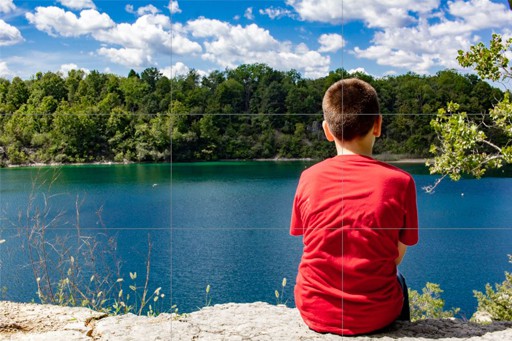
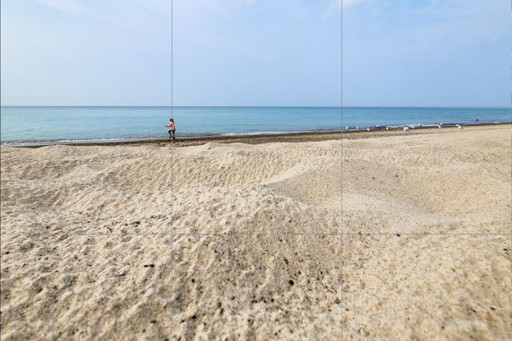
Rule of Thirds
The rules of thirds is breaking your image into segments and lining your subject up with the resulting grid.
Ideally, your subject will fall on a point where the vertical and horizontal grid lines intersect.
Rule of thumb: When shooting landscapes, you want the sky to take up either one-third or two-thirds of your photo. So, you’ll want your horizon to fall on one of the horizontal grid lines. But remember, that rule is just a guideline. Some amazing shots have been created by rebel photographers who break this rule. Some rules were just meant to be broken!
Perspective
Defined as “the sense of depth or spacial relationship between objects. ” Perspective is essentially your point of view. Moving left or right or up or down changes your perspective. You practice this each time you move around to get that perfect shot.
Here’s a great article on the 5 types of perspective
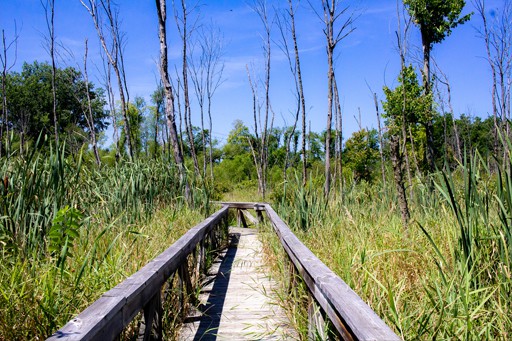
Leading Lines
Leading lines draw your eye into the image. They can be used to create interest, and to help lead people’s eyes around the image. Leading lines can be a tree, a log, stairs, the hiking path. Pretty much anything can be a leading line if you make a little effort to compose it that way!
Settings for Successful Hiking Photography
This is where things start to sound intimidating. All the numbers I’m about to throw at you are probably going to be confusing at first, at least they were for me! Even if you’re an absolute beginner and this is the first time you’re hearing any of these terms, I’m going to blow your mind.
The numbers themselves aren’t all that important at first.
Say what?
That’s right. When I first started learning to use my camera, I hardly looked at the numbers in any of the settings. I was already overwhelmed with trying to find anything in the massive menus or trying to undo whatever button I just hit on accident.
I’ll try to break it down as simply as I can.
I knew there was a relationship between all the settings. But trying to understand and remember all of them was like trying to learn Japanese. So, I just learned ISO. I knew that if it was bright outside, I needed a low ISO number. I set it to 100 and started shooting. If my image was too dark, I checked my cheat sheet (below) and changed a different setting. It made settings and their relationships second nature to me very quickly. My advice to you if you’re overwhelmed with settings like I was, is to try that.
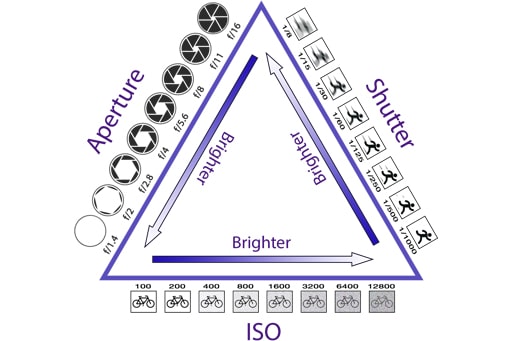
ISO
ISO is your cameras sensitivity to light. The more brightness there is, the lower your ISO should be. In a low light situation, your ISO should be higher to compensate for the lack of light.
Shutter Speed
Shutter speed is important to movement and light. The faster your shutter, the less motion blur you get, but the less light your camera lets in. The slower your shutter, the more light is allowed in, but the more motion blur you’ll get.
Aperture
Your depth of field. Also, how “open” your lens is. The lower the aperture number, the shallower your depth of field is, and the brighter your image will be.
The settings all work together to create depth, light, and motion blur.
Using Lens Filters for Hiking Photography
Lens filters are a fantastic way to improve your photography, and they’re really easy to use! Lens filters help to improve your photos in a number of ways, from adding color and contrast to protecting your lens from damage. In this section, we’ll take a look at some of the different types of lens filters available and what they do for your hiking photography.
UV Filters
These help reduce glare and protect your lens from dirt, sand, and scratches. They’re affordable and no matter what filter you choose, they’re well worth the investment for the lens protection alone.
Neutral Density Filters
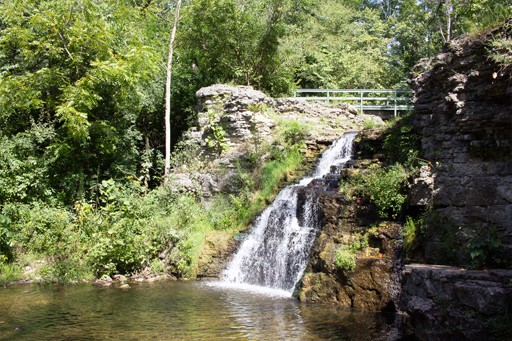
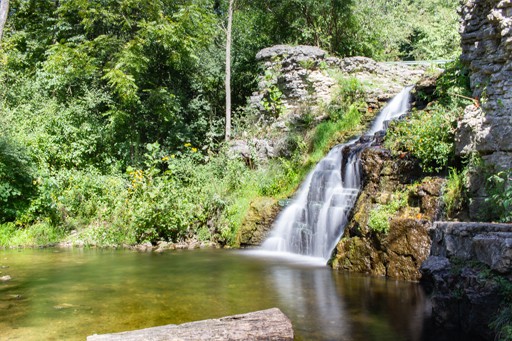
Also known as ND filters, these darkened filters help you achieve some pretty cool effects in your photos. Those silky-smooth waterfall pictures you love to see were probably shot using a ND filter.
They work by reducing the amount of light your camera lets in. So if you wanted to capture a silky waterfall, you could keep your shutter speed very low to capture the movement and the ND filter would stop the image from blowing out, or becoming totally white, from too much light being let in.
Some ND filters are variable, meaning they have many settings built into them. You can change between the settings by rotating the filter. I have a variable ND and I use it often, but sometimes an x can appear in photos if I’ve turned it too far.
You can stack screw on ND filters to make a darker filter.
My 52mm Variable ND Filter and my 77mm Variable ND filter
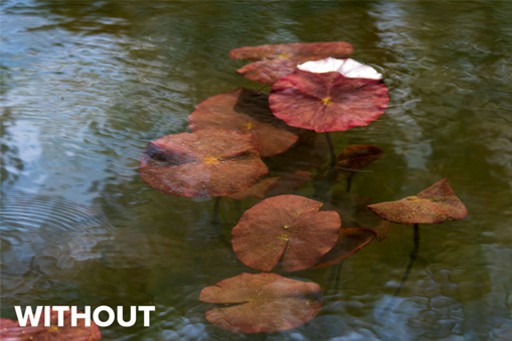
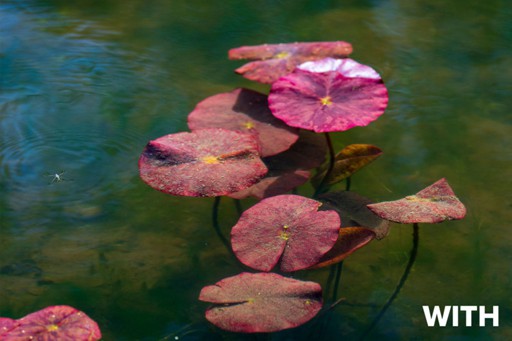
The two images below show the difference in using an ND filter or not using one. The water in the first photo is choppy and rough. The smoothness of the water in the second photo was made possible by using a ND filter.
Polarizing Filters
If you’ve ever worn polarizing sunglasses, you’ve seen what these filters do. They help to reduce glare, haze, and keep colors saturated, instead of the photo having a washed out look. This filter is ultra-helpful for hiking photography, where you’re at the mercy of the elements around you.
In this example from PetaPixel, you can see the huge difference between using a polarizing filter and going without. You can see that there’s much less glare on the water, the color of the plans is more vivid, and it just generally looks more appealing.
Editing Your Hiking Photos
My favorite editing apps
Adobe Photoshop and Lightroom
These two programs are photo editing powerhouses. I use both in almost all of my editing, though I use Lightroom significantly more. I find it easier to make any edits related to color and light in Lightroom.
I’ve been a big user of the full Adobe suite for many years. It’s what we used for everything in college, so I learned it during my classes and came to know the software well. While Adobe’s programs might be some of the most popular for photographers across the globe, it’s definitely not the only or best option for everyone.
Gimp
Very similar to Photoshop, this free editing software can do so much. It has all the same basic tools as Photoshop provides, and you can customize the interface just as you would in PS. You can easily add features and tools to GIMP using plugins. I think it’s safe to say that when it comes to editing photos, if you can do it in Photoshop, you can do it with GIMP.
If you don’t have a lot of RAM or space on your hard drive, GIMP is an alternative to PS. It needs a lot less space and RAM on your computer than Photoshop requires. GIMP recommends only 128MB of RAM, while Photoshop recommends 16 GB or more.
If you’re not sure you want to spring for the Adobe subscription, GIMP would be a great way to see if you like editing in a program like these before you have to purchase.
Adobe Photoshop Express
A mini photoshop you can carry everywhere. You can make a variety of adjustments, apply filters, and quick share to social media.
You can download the app for Android or iPhone.
Snapseed
This app is similar to PS Express. I think that it has a simpler interface, and I was able to find most settings easier than I did when learning Photoshop. Snapseed makes it simple to add filters, access tools such as curves, tune, details, and white balance, and let’s you save copies or export in various sizes. Snapseed is also free, while it’s PS counterpart requires a subscription.
What’s in My Hiking Photography Pack?
Curious about what I keep in my own photography pack? This is all the equipment I have in there. It may look like a lot, but I don’t carry all of it with me every time I go out. That would be insanely heavy! I choose the equipment that will be the best for what I’m going to use it for on each trip. As you practice your own hiking photography, you’ll quickly learn what gear is your favorite and which you need to take with you to get the photos you want.
Cameras
Canon Rebel t5i.
Yes, it’s old. In fact, it’s the very first “real” camera I ever picked up. It’s a crop sensor camera (APS-C), so I don’t use it often anymore, but this camera is still going strong! I’m completely surprised by the fact that after about 7 years of heavy use, it still works as well as it does.
Canon EOS R
This is my first mirrorless camera and also my first full frame sensor. It captures more in photos than my crop sensor camera does.
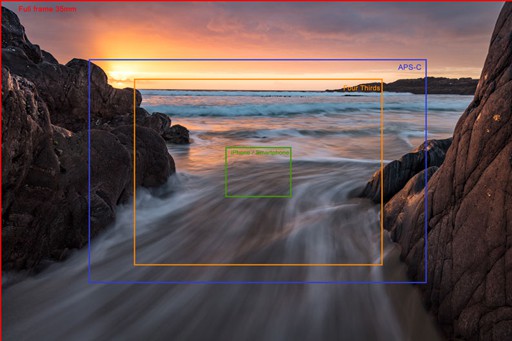
Here’s a visual on sensor size and what they each capture. APS-C or cropped sensor is blue/purple and the entire image is what a full frame sensor captures. Pretty big difference!
GoPro Hero 4
My trusty little sidekick for cool action shots.
GoPro MAX
I’m just starting to learn to use this well. 360 video is a whole different beast!
Samsung Galaxy Note 20
Yep, it’s a phone. It has an incredible camera though. And if you shoot in pro mode, you have access to many of the same settings as a DSLR or mirrorless camera have.
Samsung Galaxy 23 Ultra–
An upgraded version of my old phone but this camera is also amazing.
Lenses
Tamron 70-200mm f/2.8
My favorite lens by far. Back when I did portraits, I pined for this lens which was way out of my budget. A couple years ago I happened to find mine on sale at a camera shop in my town and it quickly became my most used lens.
Great deals are out there! If you have any camera shops in your area, go check them out. A lot of them have great deals on used lenses.
Coming Soon: Post on Buying a Used Camera Lens
Canon 50mm f/1.8
This was my favorite portrait lens way back when. It’s a prime lens and that helps it create super sharp images. Now I use it when I want to photograph something like a flower and have that nice, creamy blurred background to really make the subject pop, like in the examples below.
Canon EF-S 24mm f/2.8
One of my favorite lenses for landscapes.
Canon EF 70-300mm f/4-5.6
I honestly don’t use this lens much. I carry it just in case.
Filters
Various UV filters
Polarizing Filter
Variable Neutral Density Filters
Miscellaneous
Extra Batteries
Remote Trigger
Tripod
I use this tripod. It’s got a lot of nice features.
Canon Connect App
Not technically in my bag since it’s an app, but I still use it often, so I included it.
Canon Connect App for Android and Iphone
Extra SD Cards
Going to take a photo and seeing SD CARD FULL on the screen is a bummer. You’re forced to either check and delete photos right then and there to make room or miss your opportunity.
I always have at least one extra card with me, but usually more since I carry them in an SD card organizer.
Cleaning Kit
Small kit that includes a blower and lens cloths to keep my lenses and sensors clear.
How To Take Hiking Pictures on a Solo Hike
There’s a lot of easy ways to get great photos of yourself hiking, even on a solo adventure!

Use Burst Mode
It will forever be a struggle to get that one perfect shot. Using burst mode lets you take a number of photos for a better chance. Set your camera to burst mode and change your posing as it clicks away.
Use the Timer or a Remote Shutter
On a phone, you can set the camera timer to snap after a countdown. For camera users, a remote shutter allows you to control the shutter and sometimes settings as well. If your phone has an S pen, you can use that as a remote shutter as well. I use mine to take photos and start/stop recording video. Just remember to hide the remote/pen in the photo.
For Canon users, the Canon Connect app lets you control your camera from your phone. If your camera is Wi-Fi capable, it’s most likely able to use the app.
Canon Connect app for Android and Iphone
Don’t Worry About Other People
I don’t mean stand in front of someone to get the perfect view. I mean don’t worry about what they think about you posing and repeatedly trying to get the perfect photo of yourself. It’s something I struggled with at first. It can feel silly running back and forth to your camera and posing in front of your camera. Sometimes it gets you some odd looks from others. But they don’t know you, and chances are, you’ll never see them again anyway.
Learn to Pose
Try out a few poses before hitting the trail. When you find one you really like, practice it. It’ll start to become second nature.
When you find a pose that just seems to always work for you, use it as your go to pose for when you’re feeling uninspired or for days where you just feel your posing is off.
Some of my favorite places for posing inpiration are:
@worldofmarije and @ontheroadwithjen
Take Video Instead of Stills
I learned this trick when trying to take good pictures of my puppy when she wouldn’t sit still. Instead of getting frustrated with only getting photos of her with two blurry heads, I just recorded a video and saved a good image from it. You can do this on a phone or with video editing software.
Tips to Improve Your Hiking Photography
Practice
This is the most important tip of all. I can’t say it enough. Even while taking a digital photography course at my college, we didn’t learn from a book. We learned by doing. The more I got out there and used my camera, the more I learned what different settings did and how they intertwined with other settings. I honestly don’t think I would’ve learned as fast and as well as I did if this isn’t the way we did it. The more you go out and take pictures the better your photos will become.
Keep Your Camera Ready
Carry your camera in an easy to access place. This way when you see the perfect shot you can quickly your camera out and capture it. I usually carry mine around my neck on the head strap, but this can start to hurt after a while. Another option is to use a camera harness or clip.
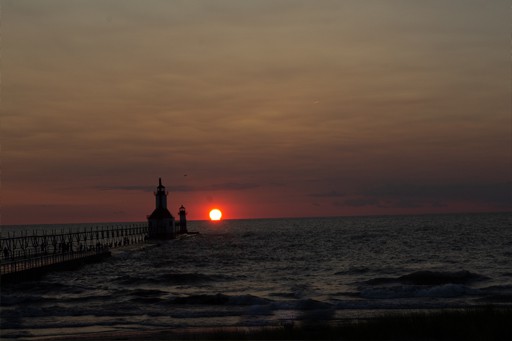
Time it Right
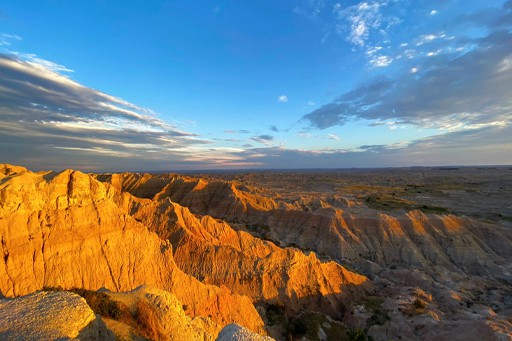
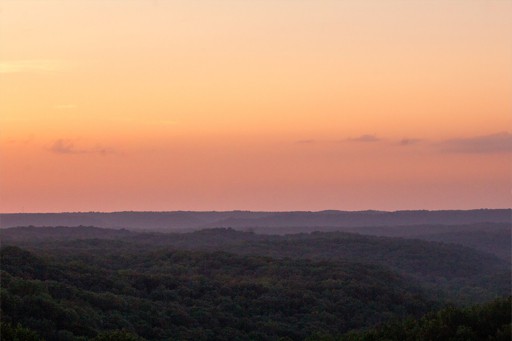
Hitting the trail early or in the evening has a lot of benefits. Besides helping you avoid afternoon thunderstorms and crowds, getting an early or later start also lets you utilize the amazing time period known as golden hour.
Golden hour is considered one of the best times for photography of all types. The light is usually even and low, eliminating harsh shadows or blown out areas in your photos. It also helps to avoid the washed out look on natural features you get when the sun is high in the sky. You can see the drastic difference between photographing at golden hour versus mid afternoon in the photos below.
Getting to your location for golden hour or sunrise/sunset might mean hiking in the dark. It can be intimidating to start a hike before there’s any light to guide you, but it doesn’t have to be. Check out my post on hiking at night to see how easy and fun it can be!
Read: Hiking at Night
Try Different Angles
Experimenting with angles is a great way to achieve a unique perspective of popular views. Instead of just holding your camera at face level and snapping away, take some time to try different angles. Get low and look upward, get higher and show the view, Look through the trees or vegetation toward your subject.
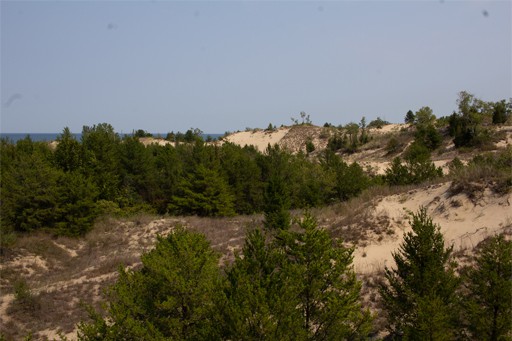
Use the Foreground
If you feel like your photos look flat, it could be caused by not using foreground space. Framing your shot so that there’s something in the foreground adds depth to photos.
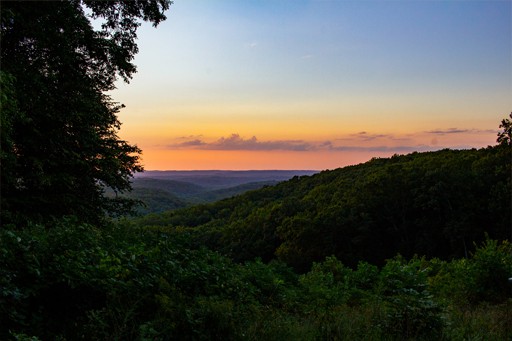
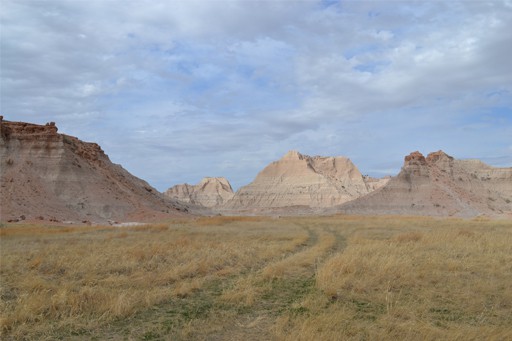
See how moving to put trees and one of the hills into the foreground added so much depth and interest to the image?
Add People to Your Shots
Sometimes pictures don’t do the scenery justice. In real life you can see and feel how towering and majestic that mountain range is, but a photo may not be able to capture that humbling effect. Adding a person to the frame really puts the scene in perspective.
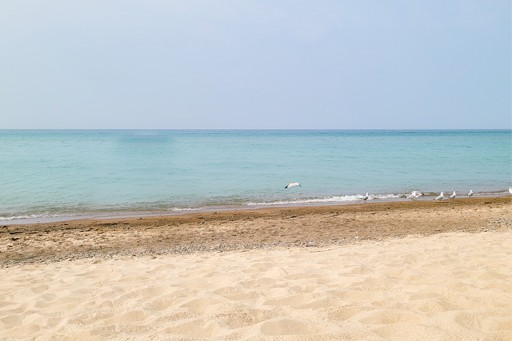
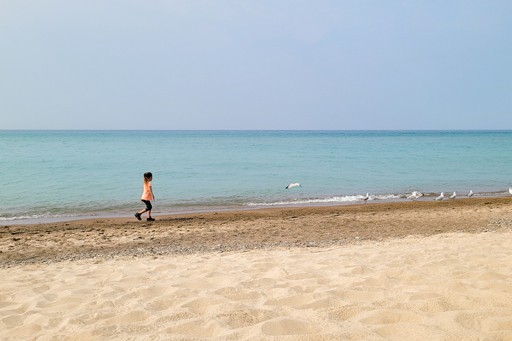
The same exact image with my daughter edited out. In the first photo, you can tell it’s a wide-open space, but you can’t really see the true perspective. In the second photo, my daughter in the frame helps to show just how spacious everything really is.
Bring an Extra Battery
Your camera dying mid hike is obviously not ideal. Taking lots of photos, using the camera screen, and checking your photos often can all lead to faster drain. Prevent an early end to your photography adventure by carrying an extra battery or two.
Pro tip: Batteries drain especially fast in colder weather. If you’re attempting hiking photography in the cold, keep your batteries in your pocket or close to your body to help stop premature drainage.
Keep Your Lens Clean
It’s not my strongest suit. It’s all too easy to forget to wipe your lens when you’re excited about what’s in front of you. Thinking you’ve taken the perfect shot and getting home to edit only to realize your image is spotted is a drag. While dust spots are fairly easy to edit out using blemish tools and other tricks, it’s one more step in the editing process. You can eliminate ruined photos or extra work by remembering to clean your lens.
Keep the Horizon Level
Another easy fix during editing, but straightening your photo in post can mess up your composition. If you’re terrible at keeping the horizon straight while taking photos like I am, turn the grid on so you can see it while you compose your shot.

As you can see, there is a lot that goes into taking great hiking photos. This post should give you a good starting point for getting started with your hiking photography. Key info to remember, your camera choice is not ultra-important in the beginning, practice helps you learn, and how you compose your hiking photo can make or break it. But, most importantly, don’t be afraid to experiment – try out different angles and compositions, and see what works best for you. And don’t forget to have fun with it! As long as you keep practicing and learning, your hiking photography skills will only continue to improve.
Happy Adventures!
I know that the sheer amount of information can be intimidating. Don’t let the settings, “rules”, or gear choices stress you out. Shoot me an email if you have any questions about any part of this post and I’ll be glad to try to help you! Or just let me know what else you would like to learn and I’ll be happy to help with that as well.
FAQs About Hiking Photography
How do you carry a camera while hiking?
To carry a camera while hiking you can use a neck strap, camera harness, or a camera clip. A neck strap can start to cause neck pain on longer hikes which can make hiking photography not so fun.
Should I bring my camera backpacking?
Yes, you should bring your camera backpacking. Even if photography isn’t your passion, you can still take photos to create lasting memories of your backpacking trip you can share with others.
Related Posts